I just thought that it might be a good idea to put all the Halloween Nail Art Tutorials that I did last year on one post. I plan to be making some more costume oriented designs this year so if you need nail art for your costume or just have an idea please leave it in the comments section! Thanks and enjoy!
Friendly Frankenstein:
Easy Spiderwebs:
Bats, Spiders, and Webs:
If you are in need of any nail art supplies please check out my shop: All Nail Shop!
Showing posts with label design. Show all posts
Showing posts with label design. Show all posts
Saturday, October 9, 2010


Thursday, July 1, 2010
Miu Miu Swallow Print Nails
Ok so this design was requested a lot but I never really wanted to do it. I get into mood where I don't care how much people want to see it; I don't want to do it. I guess I was being a little selfish so I finally sat down last week and banged this one out.
 For my base color I used OPI Russian Navy and for the design I used a light pink Art Deco polish and a white stripe rite. The rest, so they say, is history...


Check out the video below to see how I did it!
Sunday, June 13, 2010
Piano Key Nails
Hello everyone! It has been such a long time since I've been able to create a video, blog post, or even just do a design on my own nails...but alas I am finally figuring out how to make so "me" time amongst all the chaos. So for my first design back I figured this piano key design was the place to start.
Overall the process was simple and all it really comes down to is drawing a lot of straight (or in my case semi-straight lines). I hope you enjoy the photos and video below and would love to hear your thoughts!


Overall the process was simple and all it really comes down to is drawing a lot of straight (or in my case semi-straight lines). I hope you enjoy the photos and video below and would love to hear your thoughts!


Saturday, February 27, 2010
Ransom Note/Message Nail Art
I’ve been a bit sick for the past few days which I am pretty sure is thanks to my new job—being around a lot of new people usually does this to me—so when I went to make my tutorial today I wanted something that wasn’t all too difficult but was still pretty, fun, and unique. I was recently asked about nail decals and while I don’t have any of those on hand, this design sort of incorporates the techniques that you would need in decal application. Moving along...
This design resembles a ransom note—now, I haven’t personally seen a ransom note (thank goodness) however I’m sure that we’ve all seen the generic cutout letter ransom note that movies and television shows depict.
I first went through and painted my nails a nice dark navy color (Zoya’s Ibiza) and then let them dry completely. Next, I went through and cut out some works and letters that I liked from an older magazine that I had lying around; this was the fun part. I then applied top coat to my nails (Seche Vite) and then went about sticking on my words.
I really think that this design is fun and gives the wearer a bit of freedom to be as creative as you they can be! I hope you all enjoy this one—let me know what you think in the comments!
Products Used:
Nail Magic Nail Hardener
Seche Clear
Zoya—Ibiza
Seche Vite
An old Gourmet magazine!
Pictures:


This design resembles a ransom note—now, I haven’t personally seen a ransom note (thank goodness) however I’m sure that we’ve all seen the generic cutout letter ransom note that movies and television shows depict.
I first went through and painted my nails a nice dark navy color (Zoya’s Ibiza) and then let them dry completely. Next, I went through and cut out some works and letters that I liked from an older magazine that I had lying around; this was the fun part. I then applied top coat to my nails (Seche Vite) and then went about sticking on my words.
I really think that this design is fun and gives the wearer a bit of freedom to be as creative as you they can be! I hope you all enjoy this one—let me know what you think in the comments!
Products Used:
Nail Magic Nail Hardener
Seche Clear
Zoya—Ibiza
Seche Vite
An old Gourmet magazine!
Pictures:


Saturday, February 20, 2010
Color Block/ Mod 60's Inspired Nails
I’ve really been wanting to use these French manicure guides that I’ve had forever to do something, and I truly couldn’t think of anything until today! (BTW I don’t wear French manicures very much at all so that wasn’t really an option.)
The French manicure (FM) guides that I have actually came from a FM set I bought a few *years* ago from Sally Hansen. At the time I had no idea that Stripe Rites and other nail art polishes existed so I purchased the set solely for the white polish with the thin brush. Included were a sheer polish, top coat, and the white polish along with the aforementioned guides. To this day I’ve kept them around thinking that I may one day use them and today my friends I found their purpose!
I’ve wanted to do a color block design for a while now and I’ve tried creating them several times which were all overly complicated and usually ended in a steaming pile of fail. On my attempt today I decided to keep it simple and *finally* came out with a wearable design. If you are curious as to what I’m blabbering on about, here are a few pictures:

 The products I used were:
BASE
Nail Magic Nail Hardener (Review can be found here)
Seche Clear (base coat)
Zoya- Purity (white)
DESIGN
OPI- ‘The “IT” Color’ and ‘You’re a Pisa Work’ (yellow and pink)
China Glaze- ‘Flying Dragon (Neon)’ and ‘Blue Sparrow (Neon)’
Misa- The Grass is Greener on My Side (Neon)
Stripe Rite in White (my line corrector/eraser)
TOP
Seche Vite
All in all I really did enjoy the way this came out. If I was going to do it again I would find something thinner than the FM guides as I think they were a little too thick for the size of my nail.
If you’d like a more in depth description of the process than check out my video below:
The French manicure (FM) guides that I have actually came from a FM set I bought a few *years* ago from Sally Hansen. At the time I had no idea that Stripe Rites and other nail art polishes existed so I purchased the set solely for the white polish with the thin brush. Included were a sheer polish, top coat, and the white polish along with the aforementioned guides. To this day I’ve kept them around thinking that I may one day use them and today my friends I found their purpose!
I’ve wanted to do a color block design for a while now and I’ve tried creating them several times which were all overly complicated and usually ended in a steaming pile of fail. On my attempt today I decided to keep it simple and *finally* came out with a wearable design. If you are curious as to what I’m blabbering on about, here are a few pictures:


BASE
Nail Magic Nail Hardener (Review can be found here)
Seche Clear (base coat)
Zoya- Purity (white)
DESIGN
OPI- ‘The “IT” Color’ and ‘You’re a Pisa Work’ (yellow and pink)
China Glaze- ‘Flying Dragon (Neon)’ and ‘Blue Sparrow (Neon)’
Misa- The Grass is Greener on My Side (Neon)
Stripe Rite in White (my line corrector/eraser)
TOP
Seche Vite
All in all I really did enjoy the way this came out. If I was going to do it again I would find something thinner than the FM guides as I think they were a little too thick for the size of my nail.
If you’d like a more in depth description of the process than check out my video below:
Sunday, February 14, 2010
New York Fashion Week Inspired Nails: Marc Jacobs
I wanted to shoot out a quick thank you to everyone who has sent me inspiration pictures (they can be of anything from nature or nails, to abstracts and people) . It is incredibly helpful! Also if you have some inspiration photos that you would like to share please feel free to send them my way: Audrey@allnailandcosmetics.com.
Now onto the good stuff:
When I asked on twitter for inspiration I received many suggestions but the one that I chose to work with was “New York Fashion Week”. Truth be told I am not too crazy about fashion/trends. I try my best to think about what works for me and what will be relevant in the years to come. So, for this topic I decided that Google was going to be my bff. I typed in my phrase and went straight to the images section. It only took me until page 2 to find something that jumped out at me.

I chose this Marc Jacobs outfit purely based on the fun colors (neon’s will be big again for spring nails this year) so it was a bit of a no-brainer to choose this one.
The main colors/themes of this look were:
Polka Dots (Black-Zoya Raven; White-Zoya Purity)
Black (see above)
Bright Green (Misa-The Grass is Greener on My Side)
Fuchsia (Essie- Life Guard)
Here is what I’ve come up with:


Now, it has been pointed out to me that the polka-dots on the blouse (inspiration pic) were actually pale yellow but I used white (accidently I should add).
This look like my others is a focus on quick, easy, nail art that nearly anyone can do! I hope that you’ve enjoyed this one! Let me know what you think in the comments!
Now onto the good stuff:
When I asked on twitter for inspiration I received many suggestions but the one that I chose to work with was “New York Fashion Week”. Truth be told I am not too crazy about fashion/trends. I try my best to think about what works for me and what will be relevant in the years to come. So, for this topic I decided that Google was going to be my bff. I typed in my phrase and went straight to the images section. It only took me until page 2 to find something that jumped out at me.

(Source: Harpers Bazaar)

I chose this Marc Jacobs outfit purely based on the fun colors (neon’s will be big again for spring nails this year) so it was a bit of a no-brainer to choose this one.
The main colors/themes of this look were:
Polka Dots (Black-Zoya Raven; White-Zoya Purity)
Black (see above)
Bright Green (Misa-The Grass is Greener on My Side)
Fuchsia (Essie- Life Guard)
Here is what I’ve come up with:


Now, it has been pointed out to me that the polka-dots on the blouse (inspiration pic) were actually pale yellow but I used white (accidently I should add).
This look like my others is a focus on quick, easy, nail art that nearly anyone can do! I hope that you’ve enjoyed this one! Let me know what you think in the comments!
Monday, February 8, 2010
Nail Trend: The Ombrè Manicure
The next design is something that I had wanted to try for a while. It first graced the runways last autumn (or winter) and was publicized as the next "it" trend by both InStyle and Seventeen Magazines. The Ombrè manicure is an interesting concept and to describe it, without a picture is difficult; my best description is: a gradient manicure which is not confined to one finger but rather, incorporates the entire hand. Don’t worry, I do indeed have plenty of pictures!
This design involves a lot of color frankening (or mixing) to create a new color. There are many techniques for this manicure and I’ve adapted them to make my own. Please be aware that this technique that I have used is best suited for mid-tone cream colors. For bright colors I would recommend All Lacquered Up’s tutorial. For dark, rich colors I would recommend this video by Seventeen. Please keep in mind that what I do isn’t the set in stone and you should be adaptive and use your creativity to help you through!
I’ve actually attempted this manicure a few times but only have pictures of my current, and it’s previous attempts. The main color I used for the purple Ombrè was ‘Spontaneous’ from China Glaze and the main color for the green Ombrè was ‘Dirty, Sexy, Money’ from Misa.

Here are the basic steps:
1. Paint your middle fingers with your main color
2. Mix your main color with 2-3 drops of white (on your scrap paper) and apply that shade to your index finger. This shade should be 2-3 shades lighter that your middle finger.
3. Mix mainly white with 2-3 drops of your main color and apply to your thumb. This shade should be 2-3 lighter than your index finger.
4. For your ring and pinky fingers you will need to repeat the process using black, instead of white polish.
Here is the finished look:

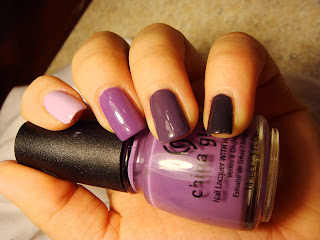

This design involves a lot of color frankening (or mixing) to create a new color. There are many techniques for this manicure and I’ve adapted them to make my own. Please be aware that this technique that I have used is best suited for mid-tone cream colors. For bright colors I would recommend All Lacquered Up’s tutorial. For dark, rich colors I would recommend this video by Seventeen. Please keep in mind that what I do isn’t the set in stone and you should be adaptive and use your creativity to help you through!
I’ve actually attempted this manicure a few times but only have pictures of my current, and it’s previous attempts. The main color I used for the purple Ombrè was ‘Spontaneous’ from China Glaze and the main color for the green Ombrè was ‘Dirty, Sexy, Money’ from Misa.

(Above: Swatch of Misa's 'Dirty, Sexy, Money')
To create the design you will need a main color, a black polish, a white polish, something to mix on (I used Post It’s) and something to mix with. You will also need a clean polish brush, I recommend using the brush from a cheap clear coat.Here are the basic steps:
1. Paint your middle fingers with your main color
2. Mix your main color with 2-3 drops of white (on your scrap paper) and apply that shade to your index finger. This shade should be 2-3 shades lighter that your middle finger.
3. Mix mainly white with 2-3 drops of your main color and apply to your thumb. This shade should be 2-3 lighter than your index finger.
4. For your ring and pinky fingers you will need to repeat the process using black, instead of white polish.
Here is the finished look:


Check out the video below for more tips and tricks!
Saturday, January 16, 2010
Easiest Nail Art Ever? Hearts (Valentine's Themed)
With Valentine’s Day right around the corner I decided to share a V-day themed nail tutorial.
Heart shapes, I learned while in culinary school are one of the easiest shapes to freehand. If you can make a dot, you can draw a heart. Now, knowing what I know I decided that I should take the pressure off for this upcoming holiday and share my little secret with all of my readers, viewer, and anyone else who happens to stumble across this article.
How to do it:
Dot and drag, dot and drag!
If you need more explanation watch my video below!
If you have any suggestions for more V-day themed designs I’d love to make them happen here!
P.S. There is a French manicure themed design coming soon!
Thursday, January 7, 2010
Gradient Nails Take 2!
 If you've folowed my blog since the beginning then you would know that one of my first nail art designs (if that is what you'd call it) was gradient nails. Meaing the color faded from clear to another color, in my case teal. This was a big moment for me and I made sure to take my time and practice it long before I ever filmed it. Well, today I am sitting here with my nails in that exact same design except this time it didn't take me an hour to do; it only took about 15 minutes from beginning to end. The effect is still very much the same, in fact they are almost identical--I am very excited to share with you the easy way to create a gradient effect!
To refresh your memory, here is the original (my nails were crazy long!):

And my re-creation:

OPI Teal the Cows Come Home
China Glaze Bermuda Breakaway
China Glaze Fairy Dust
The first method involved careful placement and blending and the second a sponge! I hope you enjoy this easy way to create this fun effect!
Here's how I created them:
Wednesday, December 30, 2009
New Year's Eve Nails
While I am always excited for a new year to begin there is also a slight bit of remorse, sadness even as the past is the past and can't be repeated. Mainly I am thinking of the good times but there are pivotal moments, key decisions which have brought me this far and made me the person I am today. 2010 will be full of wonderful moments too I am sure but like an old familiar friend 2009 will not be easily forgotten.
That being said, and what you are probably most interested in is: What nail design will I ring in the New Year with? Well, here it is! A sparkling, bedazzled, jeweled number with enough glitter to ring in the next few years--let me tell you, I am not looking forward to removing this--but for now, it is a gem to look at.
The whole design was inspired by Katy Perry and one of her amazing rhinestone encrusted designs.

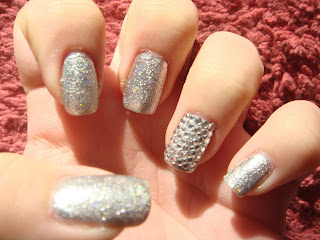

That being said, and what you are probably most interested in is: What nail design will I ring in the New Year with? Well, here it is! A sparkling, bedazzled, jeweled number with enough glitter to ring in the next few years--let me tell you, I am not looking forward to removing this--but for now, it is a gem to look at.
Please have a safe and Happy New Year!
The whole design was inspired by Katy Perry and one of her amazing rhinestone encrusted designs.

Above: Artificial Light

Above: Sunlight

Above: Sunlight, shown blurry to see some of the sparkle
Monday, December 21, 2009
Let it snow, let it snow, let it snow!
While I don't love cold weather I do love snow. There is something about the way it looks, feels and smells--that is of course until it turns dirty and brown...oh well! Snowflakes are one of my favorite holiday symbols--they are universal! So choosing snowflakes as my next nail design was obvious. My only issue is that Julieg713 did a snowflake design last year that I absolutely loved but didn't want to copy, so what did I do? I used my wrapping paper as inspiration! All of my wrapping paper is either snowman themed or snowflake themed so here's what I came up with! Hope you enjoy!
First the paper:

And here's the design:


First the paper:

And here's the design:


Wednesday, November 11, 2009
Twilight Saga--New Moon Inspired Nails
Okay, okay so I am not a crazy twilight fan however, I have read the series and seen the one movie currently out. It's fun to watch and books are incredibly easy to read so while I am not a crazy obsessed twilight fan, I am not a hater either.
This nail art design was inspired by the cover art for the New Moon book in the twilight series. It features a beautiful red and white flower which I do not know the name (sorry). Here is a picture of the book cover:


This nail art design was inspired by the cover art for the New Moon book in the twilight series. It features a beautiful red and white flower which I do not know the name (sorry). Here is a picture of the book cover:

And here is what I came up with:


The design is a combination of a feathered look and layering. I used two coats of China Glaze Liquid Leather to start with, then painted the red and white design with OPI Vodka & Caviar and China Glaze White on White. I like the overall design. It is my little way of celebrating the upcoming release of the movie without people being like, "OMG you like twilight!" if you know what I mean.
Wednesday, October 14, 2009
What I Was And Am Currently Wearing 2
If you don't follow me on twitter, or watch my youtube channel then you may have missed out on the Halloween series that I have started. The first design I did was inspired by several "Dark Fairy" looks that I found while searching around youtube--oddly enough my video never made it to youtube because the footage and contrast of colors was too dark to be seen easily. It is however pretty self explanatory!
Dark Fairy/Angel Nails:


If you've seen the videos that I have seen then this generally idea is what most of the "Dark Fairy/Angel" tutorial's have consisted of.
Next, I painted my nails with Zoya Trixie (most amazing silver ever!). After a day of plain nails I moved along in Halloween series to do cobweb/spiderweb nails. Here's what that looked like:

What I am currently wearing is what I am calling my "Friendly Frankenstein" nails. This one was inspired by cartoon frankenstein as they are one of my favorites! Here's how this one looks:


He's just so cute!
I hope you've enjoyed this What I'm Wearing....let me know what you think of the above designs, or request something you'd like to see!
Dark Fairy/Angel Nails:


Next, I painted my nails with Zoya Trixie (most amazing silver ever!). After a day of plain nails I moved along in Halloween series to do cobweb/spiderweb nails. Here's what that looked like:

Yet again, an easy to do look that is fitting for the holiday and not too crazy.


I hope you've enjoyed this What I'm Wearing....let me know what you think of the above designs, or request something you'd like to see!
Wednesday, September 23, 2009
Fire Nails
Since I haven't put up a nail art tutorial on my youtube channel in a while I figured that today I would bite the bullet. From my previous posts you can probably tell that I've just been going with plain nails--meaning that I've been letting all my amazing new colors I've recently purchased do all the work. Honestly I wasn't ready to go full fling into hardcore nail art today so instead I took the middle road and went with something easy, not to obvious and best of all quick. The technique that used is actually called marbling. It is basically swirling wet polishes together to create a marbled effect. If you've been with me long enough you might remember a water marbeling video/blog post--well this is the same idea without the water. So here is what I ended up with--nothing to ostentacious but also unique as each nail is a little different:


Saturday, June 27, 2009
Fourth of July is Coming....
My two favorite holidays are the 4th of July and New Year's Eve. I think it has something to do with the fireworks because I've never really been all too sentimental (auld lang syne) or patriotic so these holidays hold little value to me other than fun colors/sparkles/fireworks and fun times with friends.
Since beginning my Youtube channel this is my first 4th of July with you all so I decided I needed to show you how red, white, and blue can be fun and cute all in one. My latest video shows three different designs that I have come up with--unfortunately there are only so many ways to combine these colors so sorry if it seems a bit repetitive from other videos you've seen.
Here are some pics of the latest design:

This second design is my favorite probably because it looks the least traditional.

Since beginning my Youtube channel this is my first 4th of July with you all so I decided I needed to show you how red, white, and blue can be fun and cute all in one. My latest video shows three different designs that I have come up with--unfortunately there are only so many ways to combine these colors so sorry if it seems a bit repetitive from other videos you've seen.
Here are some pics of the latest design:
This second design is my favorite probably because it looks the least traditional.
Thursday, May 7, 2009
Children's Artwork Nail Design
When I sat down to do my nails I though to myself, "Audrey, ladybugs!" and after painting the light blue background I decided against. My niece had sent me some artwork and that is where the inspiration for this design came from. I think I might do a version of this for each season--Let me know what you think!


This design reminds me of being back in elementary school and let me tell you--I loved art class! It was my favorite subject! I had a lot of fun with this design mainly because I got to make the light blue color. For those of you who are new to nailpolish the process of creating/mixing your own color is called "Frankening" sort of like creating your own little Franken-polish...
If you ever purchase a color that you don't love and can't return, keep it and make your own color! I just wanted to throw out a reminder that I am about 27 subbies away from a contest!! Woo Hoo!
 I just wanted to throw out a reminder that I am about 27 subbies away from a contest!! Woo Hoo!
Sunday, May 3, 2009
Flying Bumble Bee Nail Design
So, I know that I am a bit biased but I do think that this is one of the cutest nail designs that I have done. It makes the bees look like they have jumped out of a cartoon like Winnie the Pooh instead of from a hive. It also makes me want one as a pet--but alas I am allergic so no bee keeping for me.


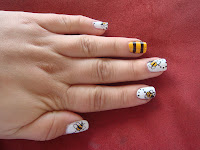

Seriously though, if anyone gives this a try I would love to see some picture!


Seriously though, if anyone gives this a try I would love to see some picture!
Thursday, April 23, 2009
Zebra Print Nails

I must say that I was not all too enthusiastic about doing this design but now tha it is all said and done, I am quite happy with the results. Animal prints have never been my style. Generally speaking (because I do own a few) I find that they look tacky and silly but I am loving my nails--weird I know.

I actually had to go out and purchase nail polish for this one (woa is me, right?!?!) so I took advatage of the buy 2 get 1 free at Sally Beauty (even though they raised the price of China Glaze). I ended up with ChG White on White, Liquid Leather, and Golden Enchantment which is the gold counter-part to Fairy Dust. For this look I used the White on White and it was a streaky mess. By far not my favorite white but I really didn't want to go buy the OPI version in Alpine Snow (which is amazing). I also picked up 6 Stripe Rites in blue, black, white, purple, black glitter, and white glitter--so far I love them all.

I started with my regular hardener and base coat followed by two coats of the White on White. Then using the black stripe rite and a picture that I found of a zebra pattern I went to town. Generally I like to do something different with my ring fingers but since the pattern was already so busy I left them plain--Let me know what you think!

Subscribe to:
Posts (Atom)