I just thought that it might be a good idea to put all the Halloween Nail Art Tutorials that I did last year on one post. I plan to be making some more costume oriented designs this year so if you need nail art for your costume or just have an idea please leave it in the comments section! Thanks and enjoy!
Friendly Frankenstein:
Easy Spiderwebs:
Bats, Spiders, and Webs:
If you are in need of any nail art supplies please check out my shop: All Nail Shop!
Showing posts with label china glaze. Show all posts
Showing posts with label china glaze. Show all posts
Saturday, October 9, 2010


Monday, February 8, 2010
Nail Trend: The Ombrè Manicure
The next design is something that I had wanted to try for a while. It first graced the runways last autumn (or winter) and was publicized as the next "it" trend by both InStyle and Seventeen Magazines. The Ombrè manicure is an interesting concept and to describe it, without a picture is difficult; my best description is: a gradient manicure which is not confined to one finger but rather, incorporates the entire hand. Don’t worry, I do indeed have plenty of pictures!
This design involves a lot of color frankening (or mixing) to create a new color. There are many techniques for this manicure and I’ve adapted them to make my own. Please be aware that this technique that I have used is best suited for mid-tone cream colors. For bright colors I would recommend All Lacquered Up’s tutorial. For dark, rich colors I would recommend this video by Seventeen. Please keep in mind that what I do isn’t the set in stone and you should be adaptive and use your creativity to help you through!
I’ve actually attempted this manicure a few times but only have pictures of my current, and it’s previous attempts. The main color I used for the purple Ombrè was ‘Spontaneous’ from China Glaze and the main color for the green Ombrè was ‘Dirty, Sexy, Money’ from Misa.

Here are the basic steps:
1. Paint your middle fingers with your main color
2. Mix your main color with 2-3 drops of white (on your scrap paper) and apply that shade to your index finger. This shade should be 2-3 shades lighter that your middle finger.
3. Mix mainly white with 2-3 drops of your main color and apply to your thumb. This shade should be 2-3 lighter than your index finger.
4. For your ring and pinky fingers you will need to repeat the process using black, instead of white polish.
Here is the finished look:

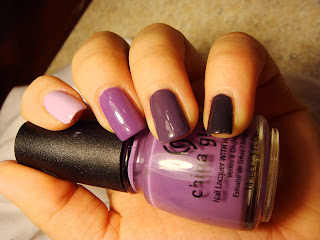

This design involves a lot of color frankening (or mixing) to create a new color. There are many techniques for this manicure and I’ve adapted them to make my own. Please be aware that this technique that I have used is best suited for mid-tone cream colors. For bright colors I would recommend All Lacquered Up’s tutorial. For dark, rich colors I would recommend this video by Seventeen. Please keep in mind that what I do isn’t the set in stone and you should be adaptive and use your creativity to help you through!
I’ve actually attempted this manicure a few times but only have pictures of my current, and it’s previous attempts. The main color I used for the purple Ombrè was ‘Spontaneous’ from China Glaze and the main color for the green Ombrè was ‘Dirty, Sexy, Money’ from Misa.

(Above: Swatch of Misa's 'Dirty, Sexy, Money')
To create the design you will need a main color, a black polish, a white polish, something to mix on (I used Post It’s) and something to mix with. You will also need a clean polish brush, I recommend using the brush from a cheap clear coat.Here are the basic steps:
1. Paint your middle fingers with your main color
2. Mix your main color with 2-3 drops of white (on your scrap paper) and apply that shade to your index finger. This shade should be 2-3 shades lighter that your middle finger.
3. Mix mainly white with 2-3 drops of your main color and apply to your thumb. This shade should be 2-3 lighter than your index finger.
4. For your ring and pinky fingers you will need to repeat the process using black, instead of white polish.
Here is the finished look:


Check out the video below for more tips and tricks!
Tuesday, September 29, 2009
Water Inspired Nails!
Since my last post/nail design was fire or lava inspired I figured I'd cool it off a bit with water inspired nails this time. Truthfully, I was working on a beach/swimming design that got way off track. I had a beach ball on one nail and a terrible umbrella on another--it was not cohesive at all, but I suppose that is what I get for sitting down with no real idea of where the design was going. I went on and filmed this whole catastrophe from beginning to end (which will be interesting to edit) and instead of going straight to youtube I figured I see what my lovely blog followers thought.
The technique that I used to get an underlayed look was layering. I started with OPI Teal the Cows Come Home then splotched a navy, light blue and holo over that. Another layer of Teal the Cows Come Home, a few lines of white and water inspired nails is what I've got! Let me know what you think!
T he fun thing about this design is that at different angles you see different color changes and variations.
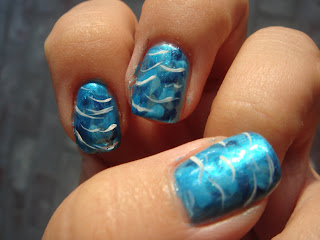


The technique that I used to get an underlayed look was layering. I started with OPI Teal the Cows Come Home then splotched a navy, light blue and holo over that. Another layer of Teal the Cows Come Home, a few lines of white and water inspired nails is what I've got! Let me know what you think!
T he fun thing about this design is that at different angles you see different color changes and variations.


Thursday, April 23, 2009
Zebra Print Nails

I must say that I was not all too enthusiastic about doing this design but now tha it is all said and done, I am quite happy with the results. Animal prints have never been my style. Generally speaking (because I do own a few) I find that they look tacky and silly but I am loving my nails--weird I know.

I actually had to go out and purchase nail polish for this one (woa is me, right?!?!) so I took advatage of the buy 2 get 1 free at Sally Beauty (even though they raised the price of China Glaze). I ended up with ChG White on White, Liquid Leather, and Golden Enchantment which is the gold counter-part to Fairy Dust. For this look I used the White on White and it was a streaky mess. By far not my favorite white but I really didn't want to go buy the OPI version in Alpine Snow (which is amazing). I also picked up 6 Stripe Rites in blue, black, white, purple, black glitter, and white glitter--so far I love them all.

I started with my regular hardener and base coat followed by two coats of the White on White. Then using the black stripe rite and a picture that I found of a zebra pattern I went to town. Generally I like to do something different with my ring fingers but since the pattern was already so busy I left them plain--Let me know what you think!

Subscribe to:
Posts (Atom)