Pages

Wednesday, December 22, 2010

Oscar Blandi Pronto Colore Root Touch-Up and Highlighting Pen


The Product:

 The Oscar Blandi Pronto Colore Root Touch-Up and Highlighting Pen is a great way to cover up roots, enhance your highlights, or just add some natural color to your hair. As the title suggests the product comes in a pen form where you click the product up through the applicator (which resembles a Stila Lip Glaze). The formula is both ammonia and peroxide free and and full of gentle conditioners. The application is very simple; all you do is paint the color on! Additionally, the color dries quickly and is waterproof. The pen comes with .16oz of product for $23.00 and can be purchased at BGlowing.com, or anywhere else Oscar Blandi Products are sold.

What comes inside the box.


My Opinion:

 This is a very fun product to use! I have the color Neutral Brown and it is just slightly lighter than my natural hair color which gave me a very refreshing low-light effect. It added extra dimension to my hair that washed out when I shampooed my hair. All in all I can't think of any downside to this product.  It would also be amazing if you do color your hair for in between touch-ups or just for adding more highlights to your hair.


My Rating:

 Ease of Use: 4.5/5
 Quality: 4.5/5
 Packaging: 4/5
 Value: 4/5


*Product provided for review purposes by BGlowing.com.

Sunday, December 12, 2010

Candy Cane Nails!

Candy canes are one of my favorite parts of the holidays (only the peppermint one's though)! So it was only a matter of time before I got around to doing this design. I've also been a bit out of the loop (nail art wise) so I thought something with straight lines would be a good starting point back in.

I can say with complete honesty that I will probably do this at least one more time before the holiday season ends. Hopefully the next time I will be able to get the lines a bit less shaky! Enjoy and Happy Holidays! 


Thursday, October 28, 2010

3 Quick and Easy Halloween Nail Designs

I have been insanely busy lately but I have been getting tons of requests for Halloween nail art. I had two hours free (that includes editing, filming, etc) and managed to put this together. While I am not totally loving the way these turned out I figured it was still worth showing you. I hope you enjoy and have a safe and Happy Halloween!

Tuesday, October 12, 2010

Go Nails Product Review

Go Nails has been a product that I have been looking into for quite a while. I'm happy to say that it is a product I couldn't live without now. Instead of boring you with all the regular information (like ingredients, how to use it, etc) I'll instead direct you to their website HERE. This is probably the only nail product that I've used where you can see results within two weeks! (all of the hardeners that I have ever tried need at least 8 weeks to really show a change). Here are some pictures to show you the improvement in my nails! Please keep in mind that my middle finger snapped off while playing with my dog (very painful!) You can see the massive improvement in the way my cuticles look and how the texture of my nails smoothed out.

Before

After

After
COUPON ALERT*** Use the code GONSZUC to receive 20% off your order at MyGoBeauty.com


FYI: This was sent to me for review purposes

Saturday, October 9, 2010

3 Different Halloween Nail Art Tutorials

I just thought that it might be a good idea to put all the Halloween Nail Art Tutorials that I did last year on one post. I plan to be making some more costume oriented designs this year so if you need nail art for your costume or just have an idea please leave it in the comments section! Thanks and enjoy!

Friendly Frankenstein:


Easy Spiderwebs:


Bats, Spiders, and Webs:


If you are in need of any nail art supplies please check out my shop: All Nail Shop!

Wednesday, September 29, 2010

More Swatches...

This is what I am currently wearing on my nails: Zoya 'Sloane'.

This is a deep black cherry color with an amazing shimmer of red and purple. I tried my best to show the shimmer but it is one of those 'hard to capture' effects. Anyways... I hope you like it!

Saturday, September 25, 2010

Rescue Beauty Lounge 'Ani'

My favorite shimmering nude in my collection is (can you guess from the title): Ani by RBL.

 It's a sheer (but buildable) peachy champagne that compliments my skin tone perfectly. While all in all I am not a huge fan of nudes (whether it be lips, nails, or the like) I can make an exception for this polish. I'm wearing it at least once every few weeks at the moment. Here are some swatches and I hope you all are having a fabulous weekend!


Sorry for the oily cuticles; I'm testing a new product and my cuticles have been kind of dry (and torn up) so I slathered them with Mango Cuticle Oil.

Friday, September 24, 2010

***Coupon Alert***

Head over to the  All Nail Shop to take $2 off an order of $10 or more.
Amount will be refunded when your order processes.
Good through 10/1/10 at 11:59pm.
No code necessary!

Questions: audrey@allnailandcosmetics.com
Follow this blog to recieve Coupon Alerts and New Product Updates!

Monday, September 20, 2010

Need Nail Art Supplies?

I've just opened an online nail art supply shop! You can check it out: All Nail Shop.The reasoning behind this is that I get asked numerous times where to find the basics (swatching wheels, dotting tools, rhinestones, etc) so instead of directing you to a hundred different sites I figured that I could just provide the tools for you! I'd love it if you glanced through and checked out the items we carry. I will be adding some different and exciting items shortly but I figured this would be a great general preview! Any questions email me: audrey@allnailandcosmetics.com

Wednesday, September 15, 2010

Peacock Feather(esque) Nails

I have been dying to try a peacock nail design for the longest time but every time I sat down to put something on my nails it looked awful. For this design I focused on the feathers (instead of the whole bird) and voila! I actually have something reminiscent of a Peacock feather! I was amazed! (notice all the exclamation points!)  Now there are things that I would do differently if I had them to do over but, for now this will suffice. I hope you enjoy and let me know what you think in the comments, I really do enjoy reading them.
BTW if you ever leave a question in the comments I will answer it on that same post so you need to come back and check it or you can leave your email address for me to respond to. Also if you'd like you can email me directly: audrey@allnailandcosmetics.com


Products Used (in order):
Nail Magic Base Coat Therapy
ChG Liquid Leather
Zoya Penny
ChG Tree Hugger
Misa Toxic Seduction
Confetti My favorite Martian
ChG Frostbite
Seche Vite

Thursday, September 9, 2010

Birthday Cupcake Nails

Some of you may know (if you follow me on Twitter) that my birthday was on Labor Day. Now for such a momentous (lol) occasion I decided that my nails should match. My birthday nails incorporated my two favorite parts of a birthday: cupcakes and candles.


Products used:
Nail Magic Base Coat Therapy
OPI Koala Berry
OPI Rosy Future
Art Deco Polish 'Light Pink'
Stripe Rite's in 'Turqoise' and 'Blue'
Zoya Purity


Here's the step by step:

Monday, August 30, 2010

Ginger and Liz 'Ivy League'

Just sharing a swatch with you!
FYI: This is not a full size bottle, it is a sample which I won in a giveaway.


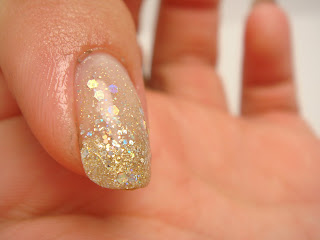
Gold and Silver Glitter Gradient

This was requested a long time ago. It's not a difficult nail design at all but I have just been so swamped that I didn't get around to it. Here's the original:
(Source)
And here is what I came up with:
Mine is a bit different but not a bad dupe of the original. I used (in order):
Nail Magic Base Coat Therapy
China Glaze French Bliss 'Ooh La La Peach'
Ginger and Liz 'Got my Groove Back'
China Glaze 'Nova'
China Glaze 'Techno'
China Glaze 'Golden Enchantment'
Seche Vite

Here's how I did it:

An International Polish Swap!

Recently I swapped with Helena from All About My Nails who is located in Portugal. I've been reading her blog for a few months and absolutely love all the swatches and different brands of polishes that she posts about. I've been wanting to get my hands on a few so we arranged a swap and I just wanted to share what I recieved. If you want to see what I sent her feel free to click here!
FYI:
My only request was no pinks or reds as I am overwhelmed with the ones I already own.

(Left to Right) All Access, Into the Night, 270, Menta, 96

And individual (very quick) swatches:
All Access

96
Into the Night


270


(My Favorite) Mentha

If ever anyone would like to do a swap feel free to contact me via email (audrey@allnailandcosmetics.com)!

Thursday, August 19, 2010

GINGER and LIZ Nail Polish Review

Not too long ago I was shopping online for nail polish (surprise, surprise) when I came across a brand that was new to me: GINGER and LIZ. Now while I in no way claim to know everything about nail polish and different brands I was surprised that I hadn't, in the very least, seen a swatch of their colors before. Since I am always looking for a good deal, and I knew that I wanted four colors in particular, I waited for a sale and then snagged these four beauties!

(Left to Right: Chase Me, Boy Toy, Reality Check, Got my Groove Back)
G and L polishes are normally $12 for .43 fl oz but on this particular occasion, I paid $8 a bottle so the same as if I was purchasing Essie or OPI. The difference? Quality!

Up until this point no "high end" polish had truly lived up to the hype for me. OPI, Essie, and the like all wore off pretty quickly on me even with a great base/top coat combination. There is a reason I have a large number of China Glaze polishes in my collection; they mimic Essie and OPI in color but are less than half the price.

The G and L polishes come in several finishes, have a wide range of colors, and wear like no body's business. I can get a solid week out of these polishes with nothing more than tip wear and since I use my hands a lot for work, that is saying something! They have a wide range of colors from professional nudes and lighter shades, to neon's and deep sultry colors. Overall it is a varied selection sure to fit anyones needs. They also have their own base coat and top coat which I haven't tried yet but am excited to get my hands on.
Below you'll find some swatches as well as my review video! Enjoy!


Reality Check

Got my Groove Back

Chase Me

Boy Toy

FYI: This is not a sponsored post and I am not affiliated with GINGER and LIZ. I'm just sharing an amazing brand with fellow nail fanatics!

Thursday, August 12, 2010

Review: Seche Ultra V Top Coat

When I first saw this product at my local Sally's I was curious to try it but would look at the price, pick up my regular top coat (Seche Vite) and leave. Recently though I had a 20% off coupon and I decided that it was time to take the plunge and see if it was worth the fuss; so here it goes:

This is a two step process:
First you need to paint your nails and use the Ultra V formula topcoat.
Second you cure the topcoat with the UV light that you purchase seperately.

The overall effect gives you shiny (almost mirror like) nails that look more like gels than nail polish. The curing (takes three mins) sets the polish no matter how thick you paint it on and gives a pretty durable finish. I went 7 days with just tip wear and on the 8th I got a chip.

By no means is this a necessity for anyone to have but it is great if you like gadgets, or the way acrylics look with out the damage to your nails!

Just so you know, this removes very easily with nail polish remover and felt or a cotton square. For more details you can check out the video at the end of the post. The last 20 second or so show you a snapshot of my nails each day to see the wear.

Friday, July 23, 2010

Nautical Nails

So my latest nail design is one which I have been admiring for quite some time now. I was browsing through The Material Instinct (Valerie's) Tumblr one day and found this lovely image of an easy and cute nail design. I am a big fan of anything nautical so I put it in my 'to do' file and left it at that. I was recently going through my computer and found it so I figured it was time. Here is what the image is:


My goal was a recreation and here is what I came up with:


Well, that's about all for now. I am trying to update this more often but life gets in the way! Watch the video below for a step by step tutorial:

Friday, July 2, 2010

If you shop online, you should be using Ebates!

I am an avid online shopper. There I said it! With sites like hautelook.com, sephora.com, and numerous others, I find myself online window shopping quite frequently. Now while I'm not always in the mood to buy I would always like to save money. I frequently 'google' coupons, codes, etc looking for a way to save a buck. Recently I've started using Ebates when I shop. Basically, it's a way to earn back money on purchases that you were already going to make (they also have coupons, and special offers). I earn a percentage of cashback depending on which sites I shop on and what category of item I'm buying. I use it for eBay, Sephora, Ulta, Victoria's Secret, etc and I can't be more happy with it. I just figured I'd pass this along for anyone like me with an online shopping addiction! :)

Sign up for Ebates

FYI: Just like Hautelook, Ebates does give referring bonuses hence the link.

Thursday, July 1, 2010

4th of July Nails!

Fireworks to be exact!

I made my first attempt at Fourth of July Nails last year. While I feel the effort was there and the designs were good I couldn't get past the nagging fact that I have never made a video or even attempted to create fireworks on my nails. So this year I decided that the time had come. For this design I started with OPI 'A Oui Bit of Red' for the base color. For the fireworks themselves I used Stripe Rites in Blue and White. For a bit of sparkle I pulled out China Glaze's 'Techno' and 'Fairy Dust'. I topped it all off with a rhinestone and voila(!) firework nail art.


I hope you all have a safe and happy holiday!